Abstract
The weather is a constant topic of interest and concern to everyone. We have weather apps on our phones, and reports on our radio’s. Yet all this information is based on weather stations that report information like temperature, humidity, barometic pressure, wind direction and speed, plus rain fall amounts.
The process of predicting the weather is beyond home weather stations. But recording those pieces of information can be fun and challenging. Add to this that the WeatherUnderGround Personal Weather Station Network, encourages you to contribute your data to their site, and you have an interesting DIY project.
So What is a Personal Weather Station
The Personal Weather Station (PWS) project allows anyone to purchase a low cost automated weather station and contribute the conditions to our website. We have thousands of stations in our world-wide network and the project is still growing! PWS
The basic idea is quite simple. Build a box to hold some instruments, like a thermometer, a barometer, a hygrometer, a weather vane, a wind speed indicator, and a rain gauge. Then all you need to do it go out every 3 to 4 hours, read the gauges, and write the values in your log book. Then you have the weather for your site.
But wait, there are a few things wrong with this scenario. First, do you want to walk out to a weather station several times a day. Second, you are the only person getting any value from your readings. I suppose that is your choice. But wouldn’t it be nice to share your information with an organization who would like to use your info. Also it would be nice to let a computer do the work of recording the values and logging the data so you don’t need to.
Digital Weather Stations
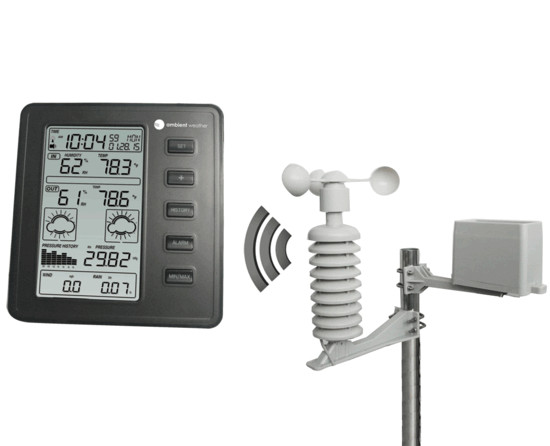
If you look on the internet there are lots of ready made weather stations for sale. They range from simple home units like Ambient Weather WS-1075, for $59.95.
To more professional weather stations like the WeatherHawk 620, for $6,825.00.
The only problem with these solutions is you really don’t know anything about how they work, could they be better, and if they are giving you good information.
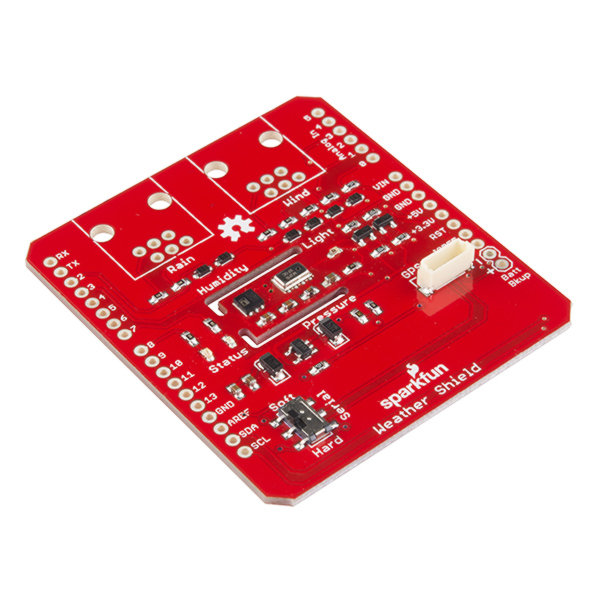
So I am proposing a different approach to a Personal Weather Station, lets build one of our own. I could go around and gather up sensors for the different parts and combine them on a bread board. But why bother when the Sparkfun Weather Shield already exists.
DIY Weather Station
So now we have decided that it is more interesting, more challenging, or maybe just more work to build our own weather station. But you should realized that if I buy an already built system this talk would not exist, and whats the fun is that?
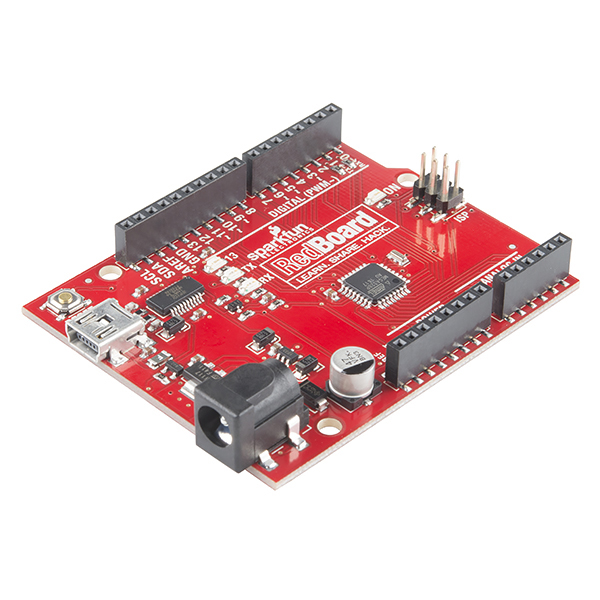
To make the Weather shield work, we will need to add a controller board, and a means of communication. I am going to choose the Sparkfun Redboard, which is Arduino compatible micro-controller.
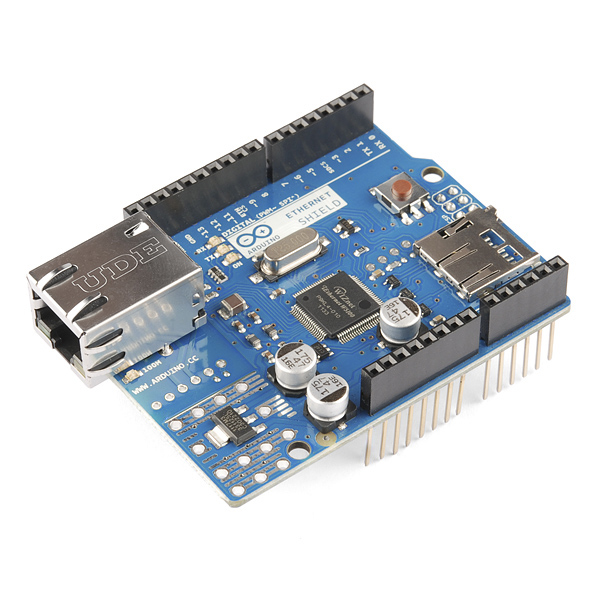
The next board I need is something to allow the microprocessor to talk to the outside world. For my purpose I am going to use an Ethernet shield board to allow TCP/IP connections to the outside world.
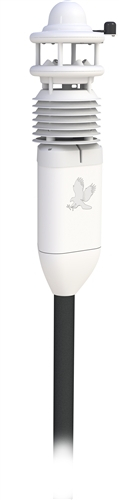
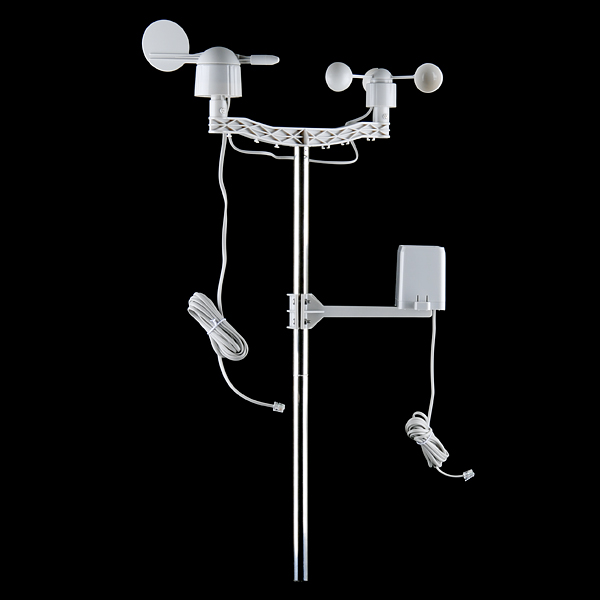
Finally we are going to add some meters to measure wind direction, wind speed, and rain fall. These meters are supported by the weather shield through 2 external connectors. So we will add these Weather Meters to our hardware.
What Software do we need?
We have now decided on what hardware we are going to use. So we now need to think about what software we are going to use. As is often the case with Arduino, there is code that already exists to read the sensors and output the data. We can find the example code on sparkfun / Weather_Shield.
If you run this software it will produce an output in the Serial Monitor like:
$,winddir=0,windspeedmph=0,windgustmph=1,windgustdir=0,windspdmph_avg2m=0,winddir_avg2m=0 \
,windgustmph_10m=0,windgustdir_10m=0,humidity=0,tempf=0,rainin=0,dailyrainin=0,pressure=0 \
,batt_lvl=5,light_lvl=0,#
Note: the \ is a line continuation character, this is all on one line.
Which is interesting since it is measuring all the values and outputting them. But in order to make use of them we need to do something with them.
But what can we do with the output?
Now we get to the interesting part. Raw data is fine, but how can you turn something like this into useful information. Well I found two ways to handle this.
Weather Underground
The web site Personal Weather Station Network describes how you can send data to them to create your own weather site. This option is covered in more detail at Weather Station Wirelessly Connected to Wunderground.
To give you an idea what one of these Personal Weather stations looks like, here is the page for White Plains, NY.
This setup uses the weather shield, with a wireless card called Electric Imp. I decided not to go this route, since I wanted to have more control over my site. I decided to use a more home grown method, which could also feed the weather underground if I so desired later.
WeeWX Weather Software
The Weewx software came about to allow home weather stations to display weather information on a local Linux Server. The system is written in python, and knows how to talk to many commercial weather stations. But because of it’s open source nature I was able to adapt it to work with my weather stations. I just had to figure out a few details.
To give you an idea of how this software looks, here is their examples page of WeeWX weather stations.
How to Interface the Weather Shield to WeeWX
Now that we have chosen what to do with the output of the Weather Shield, lets discuss what we need to do to make this work. I will begin by defining what I needed to do, then how I did it.
How to interface the data from the Weather Shield into the WeeWX software?
I did some investigation on this question and found there is an extension called fileparse. This reads the data for the WeeWX program from a file.
How to get data from the weather shield to a file?
I needed two parts to make this work. First I needed to configure the ethernet board to write data of a networked computer. Second I needed to get the data from the weather shield to a file on my Linux server.
Fileparse for WeeWX
After some digging I was able to determine that the format for the fileparse was just name = value. So after some digging I was able to take the values from the Weather Shield demo file above and convert the names to match what WeeWX needed. The results look something like this:
Date = 20150609 15:18:34
windDir = NW
windSpeed = 5
windGust = 0
windGustDir = SE
outHumidity = 75
outTemp = 81
rain = 0.0
barometer = 32.123
radiation = 3.4
Arduino talking over TCP/IP
The next trick was to get the Arduino to speak TCP/IP. By design, the Arduino does not contain any network interface. I added a ethernet shield to my weather shield to communicate over the network. I found sample code at Barometric Pressure Web Server which helped me learn how to configure the ethernet card and send out data. Now I knew how to communicate across the network from the weather shield to the Linux server.
Getting the weather data into a file
Another interesting problem was how to get the output of the weather shield into a file. Turns out in Linux there is a tool called netcat.
This tool allows me to send data from the Weather shield to a specific IP address and port. Then on the Linux server I can start a Netcat session which will watch the port, and write any incoming data into a file.
This interface works really well for what I am trying to do. The weather shield simply sends out the data at some defined interval. Then netcat on the Linux server captures the information and puts it into a file of my choice. This type of interface on the server needs few resources to monitor a port. Since all this is happening inside my firewall, so I am not worried about someone hacking my system. The data in the file is only read by WeeWX which has a good input parser and will reject anything that does not match it’s predefined input.
What about the Date?
One obstacle I ran into was how to get the Arduino to output a time stamp since it does not have a real time clock. I considered adding a real time clock to the weather shield, but then I had another idea.
There is a common time protocol know as NTP also known as Network Time Protocol. There are servers all over the world which provide a time standard for the internet.
It is common for a workstation to contact a time server to get the time. But they discourage you from making requests more than once per day. I needed the time about once per minute. Since I did not want to annoy the NTP servers, I hit upon the idea of setting up my Linux server to act like a NTP server.
Turns out that it was easy to setup. Once that was done I just needed to configure the Arduino to run an NTP client and point it to my Linux server.
Now to roll my own source code.
After trying all the different parts of the code, I was ready to roll it all together. I ran into a few problems but over all it worked fine on the Arduino. The actual Weather Shield Code is available here.
I will not pretend that this code is easy to read, but it works using the weather-shield, and this computer as the WeeWX server.
WeeWX Server
As I stated previously, the goal of this weather station is to collect the data and present it in a pleasing way to the user. The software is greatly configurable and that is one of it’s strong points. Let me show you a couple of sites I discovered.
For more discussions about WeeWX I will refer you to the User Manual Architectural Notes. This is a detailed explanation of the goals of the software.
How to setup the weather station
Now that we have a working setup for the weather we need to do two more steps before we are done.
A house for my electronics
As it turns out there are several types of houses available for the weather shield.
If you want to create an active house for your electronics you can go with the Coaxial Radiation Shield, This creates an air flow across the device, but requires active power for the fan.
A second type of cover for the electronics is a Ambient Weather SRS100LX Temperature and Humidity Solar Radiation Shield. This is a ready made case that will hold the electronics and protect them from the weather while allow accurate readings.
The third box type is the home made box. I am using some plans from a weather school in the UK, to build the Weather Box Digital out of wood. The box is then painted white to reflect the direct sun light.
Siting the weather station
There are a number of different options for how to site the weather station. Fortunately I found a good document Personal Weather Station - Siting.
The principles remain the same – get the anemometer as close to 10 metres AGL as possible, and keep the temp/humidity sensor and rain gauge as far from obstructions as possible. Stay away from pavement, rock walls, irrigated lawns, and swimming pools.
Future improvements
At this point I have a working weather station. I choose to mount my weather station on a 20 foot pole on the side of my house. It is about 35 feet from the ground and 10 feet above my roof. Once I am satisfied that everything is working well I will enable reporting the data to the Weather Underground Personal Sites, through the WeeWX software.
As a next step, I might consider replacing the ethernet card with a wireless card. This would eliminate the ethernet cable I ran inside the metal pipe. I would probably use an XBee wireless module.
If I wanted to go further to make this a more stand alone station. To do that I would need to add a battery pack, and charging circuit, and a solar panel. This step combined with the wireless card would make it a system easily moved almost anywhere. For information on using the batteries and solar panel see the article Weather Station Wirelessly Connected to Wunderground.
for more information about weather information
I would recommend having a look at Citizen Weather Observer Program or The independent weather enthustiast’s forum
Written by John F. Moore
Last Revised: Fri Jan 30 01:16:28 PM EST 2026

This work is licensed under a Creative Commons Attribution-NonCommercial-ShareAlike 3.0 Unported License.